In this project, we’ll delve into creating a sophisticated IoT-based home automation system using the ESP32 microcontroller. This allows users to control three home appliances with voice commands via Google Assistant and Alexa.
By following the steps outlined below, you’ll be able to craft your own smart home ecosystem tailored to your needs. Let’s get started.
Step 1: Setting Up the ESP32 Microcontroller
Begin by obtaining an ESP32 development board and setting up the Arduino IDE with the necessary libraries for ESP32 development.
Connect the ESP32 to your computer via USB and upload a basic sketch to ensure proper functionality.
Step 2: Integrating Google Assistant & Alexa
Next, integrate Google Assistant and Alexa with the ESP32 using platforms such as Actions on Google and Amazon Developer Console. Follow the provided documentation to register your device and obtain the necessary credentials for authentication.
Step 3: Connecting Home Appliances
Wirelessly connect the three home appliances you wish to control to the ESP32 microcontroller using appropriate relays or smart switches.
Make sure that the appliances are compatible with the voltage and current ratings supported by the ESP32.
Step 4: Writing the Control Logic
Develop the firmware for the ESP32, implementing the logic to receive voice commands from Google Assistant and Alexa via Wi-Fi. Utilize libraries such as the Google Assistant Library for Arduino and the Alexa Skills Kit SDK for ESP32 to handle communication with the respective virtual assistants.
Step 5: Testing and Debugging
Test the functionality of your IoT-based home automation system by issuing voice commands to control the connected appliances.
Debug any issues that arise during testing, ensuring smooth and reliable operation.
Step 6: Enhancing User Experience
Consider implementing additional features to enhance the user experience, such as scheduling tasks, creating custom voice commands, or integrating sensors for automation based on environmental conditions.
Step 7: Ensuring Security and Privacy
Prioritize security and privacy by implementing encryption protocols, securing Wi-Fi connections, and regularly updating firmware to patch vulnerabilities. Be mindful of data privacy concerns when interacting with third-party virtual assistants.
Step 8: Deployment and Integration
Deploy the completed IoT-based home automation system in your living space, integrating it seamlessly into your daily routine.
Monitor performance and address any issues that arise post-deployment to ensure optimal functionality.
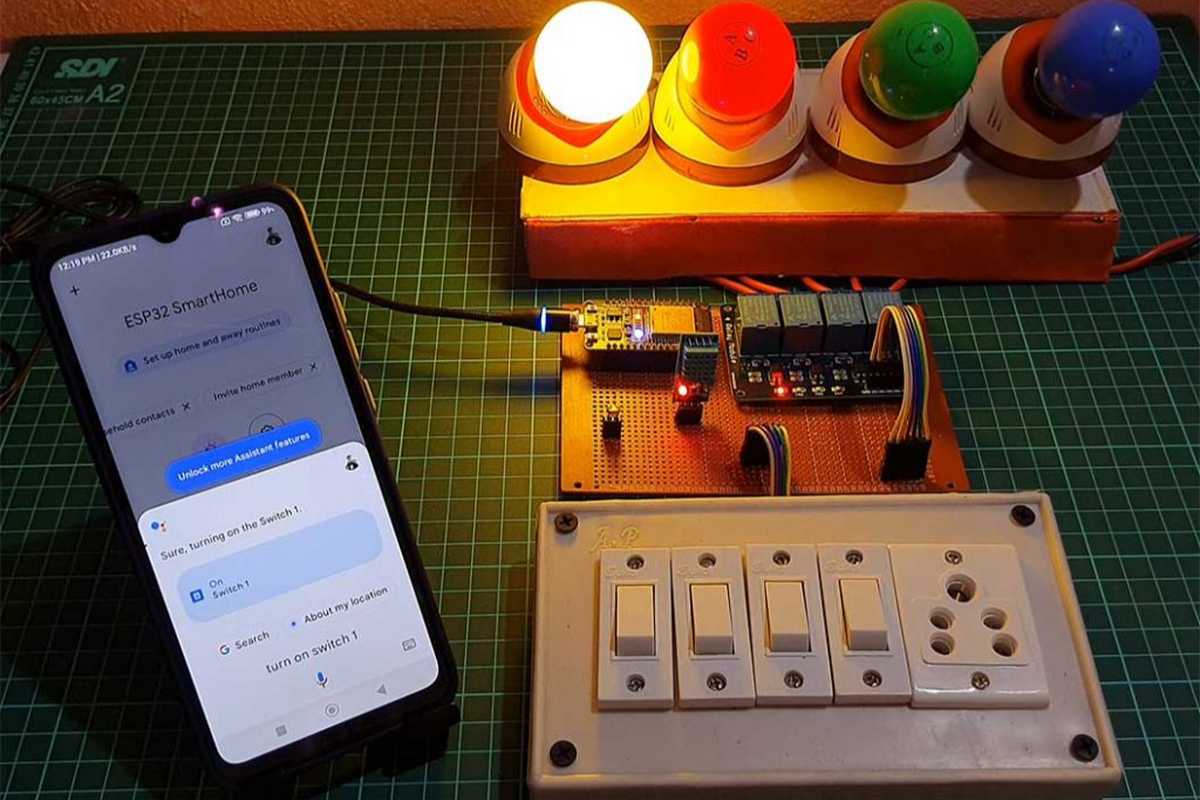
How to Control Home Appliances via Google Assistant
Once the ESP32 establishes a connection with the WiFi network, you can then enjoy seamless control over household devices via the Google Home App, as well as through traditional push buttons or manual switches.
You can harness the power of Google Assistant to give you the ability to effortlessly toggle appliances on or off with simple voice commands. Furthermore, with the convenience of the Google Home App, you gain the capability to monitor and manage relay statuses remotely.
This allows you to remove the need for a Google Home Nest device.
How to Control Home Appliances via Alexa
In addition to utilizing the Google Home App, integration with the Amazon Alexa App becomes possible once the ESP32 establishes a connection to the WiFi network.
With this setup, commanding Alexa to switch appliances on or off becomes as simple as issuing voice prompts. Moreover, apart from voice commands, the conventional push buttons or manual switches grant you control over the appliances.
Furthermore, the real-time monitoring of relay statuses becomes accessible via the Amazon Alexa App from any corner of the globe, ensuring seamless management regardless of location.
Remarkably, this IoT project doesn’t require any Echo devices for that streamlined and versatile home automation solution.